Pages

Thursday 20 December 2012

More Art Journal Pages

Ok...so I might be a little bit addicted to my journal right now. I love curling up at night in my chair and shining a light on my journal with all my buckets of crayons/markers/pastels....whatever I have near at the time! 
This particular 2 page entry is to journal that we did put up a Christmas tree this year. Last year was our first year in the house and it just didn't feel right not having my Mama here to celebrate the season with us. This year I decided that if I was going to put a tree up that I would honor my Mama and make it her tree as Christmas was always her favorite holiday of the year. 

watercolor pencil crayons and my fingers as paint brushes.
drew and colored in some images.

The double page spread.

Just because I love the cup of cocoa.


Our "Marilyn Tree" 
Merry Christmas to each and every one of you. Enjoy the magic of the season! 

Tuesday 11 December 2012

A peek into my Art Journal

Watercolor Pencil Crayons & water/black archival pen

Black fine tip marker & Pencil Crayons, Markers, 


Markers/ Distress Inks
I am loving my new Dyan Reaveley Art Journal from Shabby Shutters! Finally a place to be able to put all my doodles and drawings. There is no particular rhyme or reason to my journal. I don't always do 'the next page' and sometimes skip ahead 10 or 20 pages. There is a combination of heavy cardstock and manila paper in this journal so it gives you two different surfaces to work on. I tend to use my heavy manila paper for my ink sprays and then I use the regular heavy cardstock for other projects. I do Gesso my regular paper before using it though!
No page ever seems complete as I tend to go back and forth between pages depending on my mood. I try to incorporate the date somewhere on the page so that I can look back and know when it was worked on. Some pages have journaling on them and some have just drawings...for now. I get in moods where I will do all watercolor one night, or all oil pastels one night and I just keeping flipping pages to add a little something to each page. Its like working on 30-40 pieces of art at once. I know this is not every bodys style, but its mine...and its what works for me.
Some pages have more journaling than others and sometimes its just a random "What I am currently doing" page where I will just write all the things I am currently doing, eating, wearing, watching etc. Its a quick and fun page to do.
I have a little space set up in the loft so that when I am on 'wind down' time and watching tv at night I can haul out my journal and do some freestyle drawings and doodles. Things don't always end up the way I wish they would have but in the end its art and nobody would ever know that something wasn't intentional on the page, right?

Wednesday 5 December 2012

Large Holiday Tag

Holiday Tag
Tonight we are making THIS huge tag in class at Shabby Shutters. I am super excited about this as I love the colors and the little rosettes! Rosettes are made from Sticky Back Canvas ('cause you know how much I love that stuff!) and the rest is just inking and embossing! It is made on a huge 5'' x 10 1/2'' manila tag. The embossing is popped out from adding Black Soot Distress Ink to it and the entire tag is colored by using the Dyan Reaveley Dylusions Sprays! The top red dots paper is actually a space to hold a gift card if you choose to. Totally up to you! Just a matter of having fun with it!

Monday 3 December 2012

Mixed Media Canvas

8 1/2'' x 11'' canvas

6" x 6" canvas
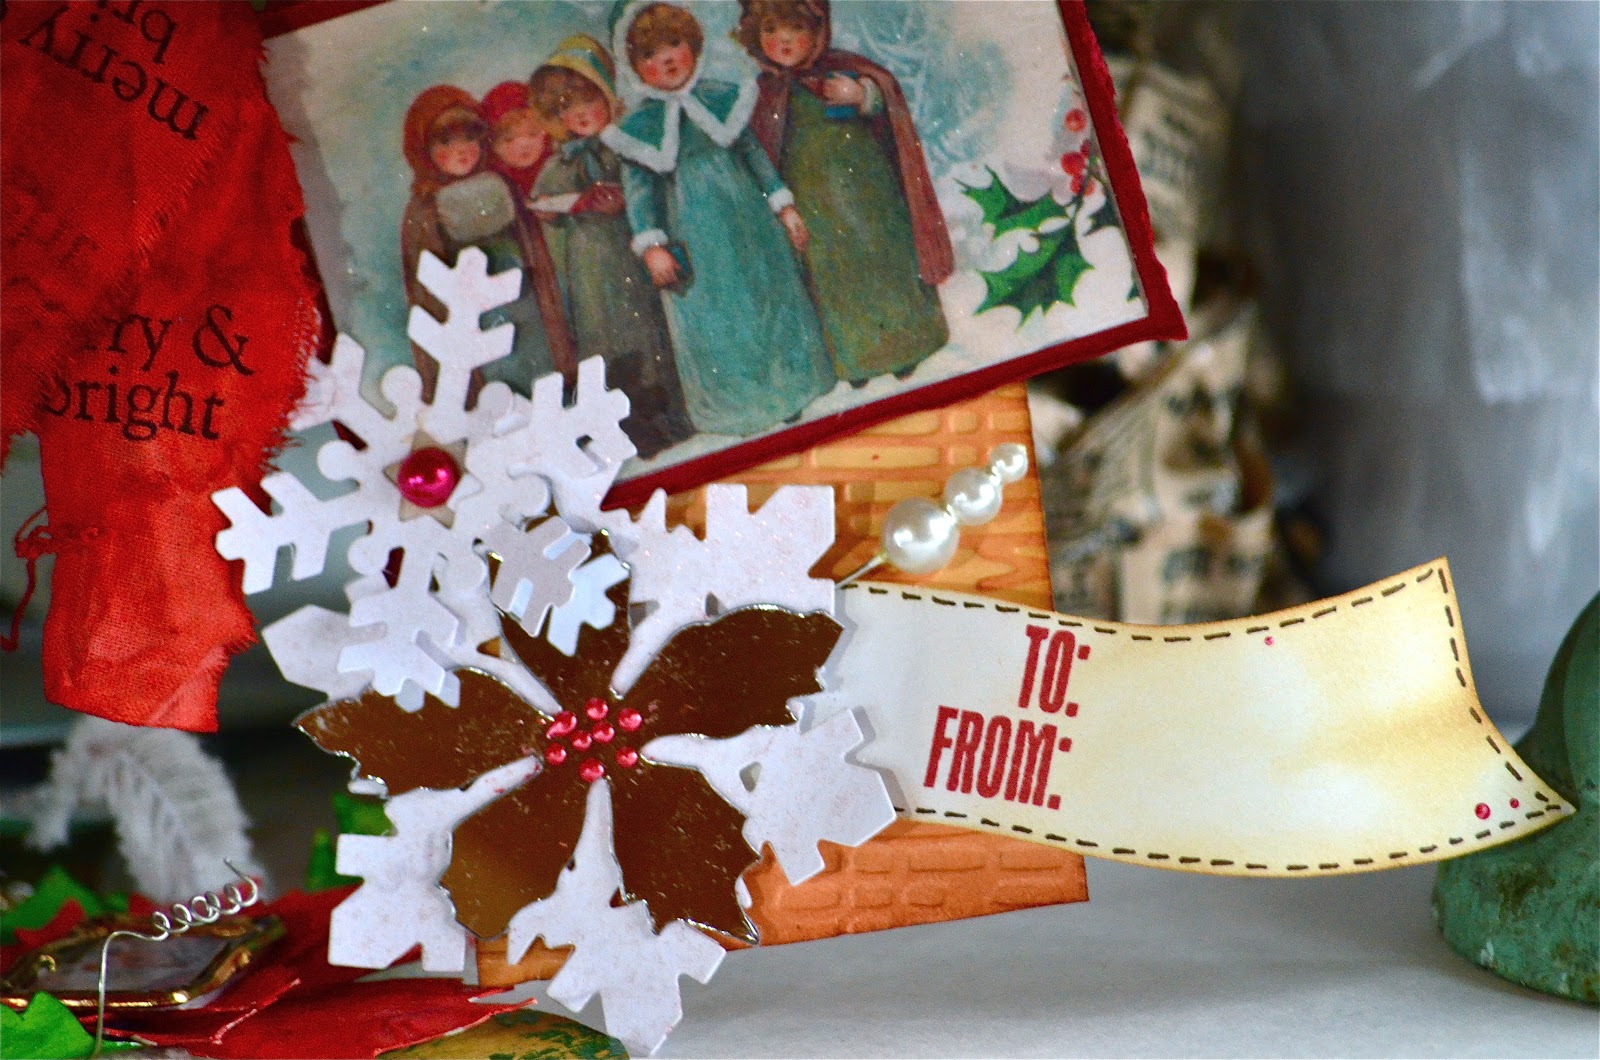
I am really into this Mixed Media Canvas Art lately. I love having 'no rules' to play by and use my fingers as my paint brushes. Paints, mediums, sprays, masks, stamps and markers all lay in a 2 foot space in front of me despite the 5' x 3' table I am working on!
For these particular canvases I had been wanting to do something special with the flowers I had made in a class at Shabby Shutters with Michelle. Someday she will get her own blog up and you can start to see all the beautiful creations she makes...but for now, I'll sneak some of her flowers in my art!
For both canvases I started by Gesso'ing my canvas and going crazy with tans and pink paints. Tissue papers and stamped words are scattered through out the canvases in no particular order. Sew Stampers are PERFECT to use on this type of art! Left over rub-ons, stickers are also perfect as well as scrap paper! A Sharpie marker fills in some doodles and a word or two. The vases were cut from scrap paper and glued on and then inked and doodled upon! Alcohol Inks, Stickles, Perfect Pearls sometimes make an appearance and Glossy Accents...always lots of Glossy Accents!
The star of the show though.....my flowers!!! Thanks Michelley!
Don't you think they fit perfectly into my vase?  ;)

Have a happy craftin' day!

Friday 30 November 2012

Holiday Wreath


Decided to try and make a wreath out of some paper and a fern punch. I first started by punching a circle and then punching another circle on the center to create your wreath 'base'. You can't tell there are different shades of green here but I did ink various shades of green onto the already green cardstock. I then started gluing (using a tacky glue) around the base and tucking in ferns here and there. I thought it needed something sparkly so I twisted a small piece of tinfoil to make the ribbon and then added red Liquid Pearls as some berries. I love my new window die from Spellbinders (and Shabby Shutters!) and played around with adding the wreath to the window and to the bottom of the window box. I still think its a little too plain but its my first attempt so at least its something I can work on!
Its a snowy day here so its a good day to play in the craft cave. Hmmm....I think I just inspired myself to create a wintery scene behind the wreath. Gotta go put the Keurig on!
Have a happy craftin' day! I know I will.

Wednesday 14 November 2012

Fun with tags

Oh what fun I had with this tag. There are so many fun things packed into one tiny tag! Tim Holtz new mirror paper and frosted paper make an appearance as well as some Dyan Reaveley Dylusions spray. This tag gets you messy and I love it! I had to wear latex gloves or it would have looked like I just murdered a project instead of created one. This is an upcoming project during my many classes of the season at Shabby Shutters. Which class you ask? Well, you'll just have to wait and see!

Monday 12 November 2012

Oh Christmas tree(s)....

A whole new world of trees for me! After meeting with the Shabby Shutters peeps we decided that instead of putting a fake tree up we were going to make our trees from paper products. My mind started wheeling around and this is what I whipped up for the first round of trees.

The products I used?

From left to right:
1. Coffee filters
2. Shabby Shutters paper bags (fringed around the tree)
3. Various shades of green paper and a flower punch
4. Dryer Sheets (Thanks for the inspiration Michelle!)
5. Shabby Shutters paper bags (twisted around the tree)

Still a fireplace and some stocking to be made out of paper...stay tuned for those creations!

Wednesday 7 November 2012

Cards of the Season

Tim Holtz launched some more die-cuts...just what I need! I gobbled up this tattered poinsettia and went to work creating with it. Can I just say, 'I love it'! This particular poinsettia card will be a card class at Shabby Shutters in Antigonish. Isn't it awesome?

Sunday 14 October 2012

Thankful

Just a quick card showing a masking technique that I used so that I could have a leaf image and script in the same square. The squares are made of Sticky Back Canvas. I stamped the image of the leaf first and then masked it so that I could stamp the script image. I colored the 3 leaves in different colors and spritzed a little Perfect Pearls Mist to give it a little shimmer.

The bee was stamped on the card base itself and then stamped and cut out from another piece of paper and adhered with a pop-up dot. I then Glossy Accented the bee to make her shine!

A few stamped images of leaves in yellow ink and some matting and this card is complete.

Tuesday 25 September 2012

Geared up a 'masculine' card!

As most of you who know me know...I have such a hard time with these masculine cards. I always want to find a way to be able to stick in a touch of pink, or if not pink then at least a liquid pearl...or 9.

This card was created while trying to come up with some future classes at Shabby Shutters. I see this little guy peeking his way into an October Card Class. Stamping, inking, embossing powders, Utee...just a few of my favorite things!

I am still working like crazy on Holiday cards for my October 6th class "24 Cards of the Season". Wait until you see all 24 of these cards together. They are looking really nice.

So, as the sun peeks in my loft windows I do believe that means it is time to turn on my Keurig and make the first cup of coffee of the day and head into my creative chaos of a mess!

Happy craftin'!

Wednesday 19 September 2012

Holiday head start!

A few weeks ago the gals and I from Shabby Shutters got away for a weekend of crafting. I didn't end up getting any scrapbooking done but I did manage to get a nice head start on some of my Holiday cards that I sell at the Airport.

Embossing is such a quick and easy way to create a beautiful card. The above 3 cards were all created with a simple embossing folder and some colored ink pads. Not a bad effect for such a simple process.

I ended up making about 20 in one day of crafting so I will post a few here and there through out the next few months leading into the season.

So...don't let intimidation get to you when deciding if you should buy or make your Holiday cards. If you started an assembly line you could easily mass produce these cards in an afternoon of crafting!

Sunday 16 September 2012

Crazy Canvas Art


I don't know who put something in the water I have been drinking lately, but who ever it is, and what ever it is...I like it. It has been making me feel very inspired!

This piece of art on canvas is not normally something I would do, nor is the 'style' of it normally anything you would see me work on. However, my brain kept telling me to 'add this' or 'add that' and VOILA...this crazy canvas art was created.

I think I like it because I have already gone out and bought a few more pieces of canvas to work with...

What do you think? Is it crazy...or am I?

Have a happy crafting day wherever you are!

Monday 10 September 2012

Road trip to Cheticamp

This past weekend, the Shabby Shutters peeps (and friends) packed our bags and headed to beautiful Cheticamp. We spent the entire day Saturday scrapping with friends, eating some amazing Acadian cuisine, listening to some pretty wild music and laughing so hard that our bellies hurt!

I wish I could say that I had ONE picture of us scrapping, but we were having SO much fun that the camera didn't even come out once during the entire day Saturday. On Sunday morning we got up and drove around to get a few pictures so that we could have the proof that we were actually there. We stopped in a few local craft stores and along a few look-offs for some breath-taking views.

Below are a few pictures that I did manage to snap during the weekend. We're all hoping to get back to Cheticamp for another great night of scrappin' with friends!

The rugged shorelines 

This little antique shop in the middle of nowhere!


We ate supper in the lighthouse! 

I couldn't help myself taking this picture. It gave me a chuckle. 

The beautiful church in Cheticamp

Wednesday 29 August 2012

Coffee anyone?

I'm going to be completely honest with you! At first this stamp set called "Coffee Keeper" from Art Impressions Stamps really intimidated me! I loved it immediately, however I couldn't seem to 'follow' the instructions on the package. Seriously, I had a hard time understanding how to put the project together. So...the stamp sat in my 'new' pile for a few weeks...until yesterday. I figured, "who were they to tell me how to put a project together?". Its a freaking cup, get over it. Alas, this version was born.

There are a lot of layers here due to the fact that I kept changing my mind. I think when I make it again there will be some changes to the layers but for now it is done and I love it. Doesn't the coffee lid look real? A few layers of Ultra Thick Embossing Powder worked wonders here.

Because it is considered a "gift card" holder and I shot the instructions out the window,  I went ahead and put a little envelope pouch on the inside of the card. This will hold the gift card.

I haven't decided if I will make this a part of a card class or not. My inspiration seems to be bursting out the sides and my hands can't keep up with the brain so I dare say that other 'versions' of this cup will be born as well.

Have you used this stamp?


Thursday 23 August 2012

All around the world

How cool is this little globe?
I almost forgot how fun it was playing with Alcohol Inks. I was truly inspired though when Sherry presented me with some very cool Tim Holtz Sizzix Dies for my birthday. I could so 'see' Alcohol Ink to separate the "land" parts from the "ocean" parts. Needless to say, as soon as I got home I put my theory to the test. This, my friends, would be the awesome result. How cool is that??

Once my card classes for this session are over, I will be sure to post the pictures and the DIY instructions so that YOU can try this very cool idea. Until then...happy crafting!

Tuesday 31 July 2012

Jar Card

I love the simplicity of this card. Using my new "jar" stamp I stamped the image as well as the sentiment on the white cardstock. I used my Distress Markers and created a blue shadow around the inside of the card and then punched out some butterflies. I colored the butterflies with the Distress Markers as well. I used the jar as a template and cut out a piece of acitate the same size as the jar. After putting some butterflies in the jar I used a little bit of Glossy Accents around the jar and stuck the acitate down, making it look like the butterflies were trapped in the jar. I stuck a few more butterflies above the jar and added "Darly Doodles" to make it look like the butterflies were coming out of the jar.

Friday 1 June 2012

I struggle to do "Masculine" cards...

Oh, do I struggle when it comes to creating something "masculine". I don't find that I am a "pink and bling" kind of girl as I do quite enjoy greens and browns and blues and purples...and yellows..and orange, OK, I know you get it, I am a gal of all sorts of color. Yet when it comes to not being able to add bling or ribbon or pearls THAT is where I struggle. For this card I did add some twine, which I think is still quite masculine (and that is only because my jute is still in my car from Gadget Girls Retreat Weekend...back in the beginning of MAY!) ....slow I'd say!
...moving on!!
...ok, so this is my traditional 6x6 card created on kraft paper. The sailboat stamp was stamped on watercolor paper and the water was colored with Tim Holtz Distress Markers and the Aqua pen. The sky was colored using Distress Stain and a mask to cover the sailboat and the cloud.  I stamped a second image and cut out the sails to create some movement (this is popped off the page). I then sprayed the sails with orange Colorwash. The cloud has some flocking added to it for another dimension of texture (is this too feminine?? ...my husband seems to think so!)
The side border is created with Kraft Resist paper and Colorwashed again with the orange. Blue twine and an anchor stamp was added to side. A nautical sentiment finishes off this card.
I think it turned out quite masculine and I love the blue and orange combination.
Hope you all have a crafty weekend! Enjoy!

Wednesday 30 May 2012

Another Scrapbook Page!

A few weeks ago Sherry, Michelle and I went to "Crop & Create Moncton" where we got to scrapbook all weekend and take some classes. There were also a couple of challenges that we could enter to win some yummy prizes. Below is one of the scrapbook pages that I created for one of my challenges.
There is a lot of hidden journaling on this page as well as some tidbids of information scattered through out the page itself. I added a little pink tee-shirt that says "Top of the Crop"...I've had it for years but just never knew where to use it and thought this was the perfect spot! It has a little wire hanger on it and it looks like it is hanging from the string of pink twine going across the page.
The "ME" is grunge board that is inked. On the "M" I cut out a little section to create a spot to let the little birdy sit. The stitching all around is completely done by markers. I don't have the patience to actually sew on a page!
Oh and the B-E-A-U-T-I-F-U-L patterned paper is from Bo-Bunny at Shabby Shutters! Go get yourself some today! The whole line of paper is gorgeous!
...Happy Crafting!

Saturday 26 May 2012

Sticky-Back Canvas....oh how I love thee!

I don't know if any of my fellow crafters out there in "Craftworld" have the same challenges as I do when working on 'male' or 'boy' cards. Boy oh boy do I struggle with them! I am all about the pink and purple and bling. In my experience most men do not like the pink and purple and bling. However, when I discovered Claudine Hellmuth - Sticky-Back Canvas...I just knew I had to try it. For some reason it screamed out "masculine" to me. I am sure it would look gorgeous in pink and purple and flowers and bling, but like I said...it screamed masculine to me.
I wanted to try a technique of 'transferring' an image onto the Sticky-Back. I think this is by far one of the coolest techniques I have ever learned. I bought a package of Sticky-Back Canvas at Shabby Shutters and went through the entire package just playing with ideas. Needless to say, I am well on my way of playing with my second package of this product. If you have not tried Sticky-Back Canvas you need to give it a try-today!

I tell you, this is one of the coolest techniques I have ever learned and I hope you go get yourself some of this COOL paper and PLAY!!

Thursday 17 May 2012

Its been awhile...

I feel like I have been missing in action. Well, actually I have been as I have not been on here for 3 months. 3 months...where does the time go? It feels like as we get older the time passes in the blink of an eye. If I had to think back to what I have accomplished over the last 3 months it would be a very short list. Sure, I kept busy (most of the time) but not to where I can say that tons of things got accomplished. As usual, I am still instructing classes at Shabby Shutters. We went on the road a few times and wound up at the Crop and Create in Moncton one weekend in April where I got to meet my female craft hero and take a class with her...the fabulous Vicki Boutin. In May we packed up the store and headed off to Pictou Lodge for a weekend of laughs with the Gadget Girls retreat. Met lots of fabulous woman and can't wait to do that again!
On the home front we got a few projects around the house accomplished...painted the entryway, painted the main level bathroom, replaced the kitchen faucet, created a spare bedroom, started gardening and attempting to mow this HUGE lawn! The good ol' ride on lawn mower is gonna get a run for its money at this house!
So, now that I have created a post I really must upload some projects to show you all the "stuff" my creative little mind attempted over the last few months. My new favorite products...Sticky Back Canvas and Distress Markers being top of the list.

My new favorite Tim Holtz Distress Markers :) 

Me acting big and scary at the photo booth provided by Crop & Create Moncton
So, until next time...I hope its not as long between blogs again!

Wednesday 22 February 2012

I finally created another scrapbook page!

Well, its been a long long time since I actually created a scrapbook page. I had a goal last year...yes, LAST year that I was going to create a scrapbook page every week for the entire year and that way there I would have 52 pages at the end of the year. Yah, right.....that didn't happen....I created the first week of 2011 and then it stopped. ...along with a lot of my creativity!
This scrapbook page is my first one that I put together in over a year. The photo is my Mama as a young girl. How cute was she? My new favorite "thing" is butterflies so I put some 3-D butterflies along with some grunge board colored in Distress Inks and Perfect Pearls Mist. A little twine and a bright yellow "Mom" embellishment finished the page off.
It is certainly a different style from what I was creating before...but sometimes change is a good thing, right?

Sunday 12 February 2012

Rock Art for my Mama

I knew that with the first anniversary of my Mama's passing approaching I wanted to do something special for her. After all, she was a pretty spectacular Mama. I miss her more with each passing day and there are times when I just wish I could close my eyes and open them to have her standing right in front of me. I miss having cups of tea with her. I miss her daily phone calls. I miss her always making sure I was home safe and sound, and whether the doors were locked and the stove is off. She always worried about everybody else but herself. When she would get mad at me she would call me "Darlene Ann"....and because her middle name is Theresa I would always call her "Mother Theresa".
This project is for you Mama.

The height of the rock is approximately 12"
I wanted to be able to take a rock and transform it into something nicer than "a rock" to place at her grave site. I had somewhat of a "vision" in my head and once I got started it came together quite quickly. I painted the flat rock white on the front (I wanted to keep the rock look on the back). I painted some vines and hearts along with the words "Mama Always in my heart" and signed it with my name along with Tuesdays date. Tuesday being Valentines Day, the day that Mama passed away last year.
I love you Mama....always in my heart!
The doodling version next to the completed project
The entire rock is sprayed with a sealer to protect it from the outdoor elements.

Wednesday 8 February 2012

Just a winters day at the beach

My Shadow
 Everyone needs a little time away from the craft table, don't they? As much as I love to craft, I also love photography. On this particular day my husband and I went driving around and I had my camera in tow. Its not too often I don't hoard it around with me. It was cold outside but it was a perfect day to clear my head and just take some pictures.
Driftwood
 We are very fortunate to be able to jump in our car and drive a few minutes to get to the beach. Anybody who is fortunate enough to live near the ocean really should take advantage of it and experience it in the middle of the winter as well as any other season. Who cares if you can't take your bathing suit and tanning lotion with you...bundle up warm and throw a scarf and mittens (fingerless ones so you can still take pictures!) on and go explore! The world is ours to discover!
My husband combing the banks
Just a glorious picture of the sun beating down on the beach
Wild Mussel shell

Thursday 2 February 2012

Upcoming Card Class

I think this little girl Marci is so cute, I just had to create a class around her. I can't wait to instruct this class...I think it will be so fun! I have used the same stamp in all three cards and have colored her with Tim Holtz Distress Inks and cut and dry tips. I used beautiful watercolor paper for all the images and cut some out, popped some up...basically, just had fun with them. This is going to be a fun class and I am looking forward to it.

Sunday 29 January 2012

Hello


Isn't she precious? I borrowed "a few" stamps from Sherry last week. They were mostly of this little girl but doing various poses. I stamped a bunch of different images and had a morning of coloring her in different outfits. This particular one I wanted to make sunny and cheery. She is colored in my trusty Copic Markers but now that I am experimenting with Distress Inks I am quite liking the coloring effects you can create on watercolor paper (but that I will show you on another day!).
There is really not much to this card with the exception of some scrap paper  (I dug deep into the scrap bin for that yellow piece with the white dots and the pink flowers. That has to be one of my favorite pattern papers and I am a complete loss for the supplier or name of the line. If you know it, please let me know so I can try and get more!
The black words are actually a transparency that I laid over the patterned paper. She is then matted on a few colors and a little black Enamel Accents make some quick "pearls" along the page. The sentiment is one from a Hero Arts collection and it is matted on pink paper and popped off the page with a few pop up dots. I don't know what her name is...but she is some darn cute!

Friday 27 January 2012

Oh Marci, Marci, Marci!

I seriously think I am going to put this card in an envelope and put MY address on the card and send it to myself. I am loving how this card turned out...
...Introducing my new little friend, Marci. Marci is a new rubber stamp at SHABBY SHUTTERS from a product line called "lalalandcrafts" and I think she is just adorable. I was a little intimidated to color her at first but eventually the Copics took over and little Marci ended up in a little yellow and purple dress. Go Marci! I had a fence stamp sitting in my stash so decided to mask Marci and make her sit on the fence (good thinking Sherry!!). I wanted to use my Spellbinders Nestabilities to cut Marci out but upon further revelation I discovered she did not fit in the damn template...ok, move on to plan #2. I had never cut out an image on the Nestibilities where part of the image was sticking out of the template. If there was a time it had to work for me, it was NOW! The image was already colored and if I ruined her and cut half her head off you would have heard some "no so nice" words come out of my craft room....
....insert exacto knife here...
It worked! I was so pleased with myself. Pat on the back to Darly! Ok...moving on....
I decided to put some pop up dots behind her head and her balloon. Oh yes, Marci only carries ONE balloon originally. I decided to stamp another few balloons on scrap paper and add another balloon (one is such a lonely number) The balloon on the left side is added and stamped by using Alcohol Inks. I used a little black marker and drew in her string from the second balloon.
I added the sentiment "Just for you" as the inside of the card has a little pocket that holds a gift card. A few black (fake) pearls with some Enamel Accents and a little purple twine pretty much completes the card. Oh Marci, Marci, Marci...what color will I make you wear next?
Here is a close up of the core of the card...